

How To Draw On Android Picture
If y'all savor talks from 360 AnDev, delight support the conference via Patreon!
When yous're creating a new view to display complex data, it's easy for the number of view objects you lot're using to become out of control. Between elaborate shapes, shaders, colors, and text in specific places and orientations, using only Android Views and layouts tin turn your view into a dense, complicated mess. Luckily, in that location'southward a ameliorate way to add all your customizations. What you lot need is a blank Sail! (Literally, android.graphics.Canvas). In this session, we'll delve into the details of using Android Canvass to display anything you need in a truly custom way.
Introduction
My name is Joshua Lamson. I love custom cartoon with Canvas.
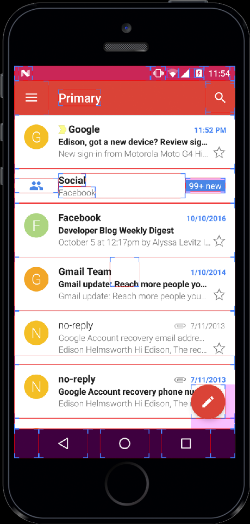
If you take not used the outline views developer characteristic, I highly recommend it. If you go into Settings > Developer Options, 1 of the choices is to outline every single view. You can see every view object that's being drawn on screen. I'll have days where I take this feature on. Ane day I was checking my electronic mail, and noticed Gmail, one email is one box, each individual word is its own thing. They're doing this with custom views.
Why Custom Drawing?
At that place are many reasons to utilize custom drawing in your app. Get-go, we use it to reduce our view hierarchy load. With the outline view setting, you tin can come across the number of views existence drawn on screen. For email apps, rather than having one view for the user avatar, i for the championship of emails, one for the content, at that place's frequently at least eight views per electronic mail. You don't need that many views.
Custom drawing makes things easier for custom graphics similar charts and graphs. Typically, if you lot desire to curl a custom chart and yous download a third party library, the library is massive because it'southward not just the nautical chart you need; it'southward also fifteen other types.
Views in the Android framework are designed to work with everything and annihilation, and so that y'all can build your ideas with the tools they've built. There's aspects of their tools that you lot aren't using, and yous don't need to support it at all. Rather than using their versions, you tin can use custom drawing to do exactly what you need.
Another big office of the appeal of custom drawing is that magic quality of truly custom furnishings that only your app has.
Last, you lot can reuse your lawmaking. Once you build 1 custom view for this electronic mail particular, you can apply information technology over and over in your app.
Where exercise we showtime?
If you want to first custom cartoon with Canvas, you demand a blank Canvass. Everything we're going to be doing today is with android.graphics.canvas.
This is an interface that Android provides for drawing whatever you want into a bitmap. To draw things on Android, you need iv major components:
- A bitmap to hold your pixels: That is what Android is going to use to make what you lot want show up on screen.
- A Sheet: This is how you take whatever you want to depict and dictate what pixels you desire to evidence up in your bitmap.
- Commands to depict: You tin draw shapes, rectangles, circles, paths for complex shapes, text, y'all can describe other bitmaps into your bitmap. The possibilities are endless.
- A paint object to describe how you want those things to look: For instance, a discussion is a word, but to depict how it looks y'all need a typeface, font size, etc.
How exercise yous get a Canvas?
Since Sheet is a wrapper around a bitmap, you can create a new Sheet and give information technology an explicit bitmap. I've found this is a rare scenario. The merely fourth dimension I've used it is when we were interfacing with a printer and we needed to transport it a full bitmap with whatever we needed. Only more oft than not, one will be provided by Android by the framework (whenever it's relevant and you need it).
Out of the many popular options to get a canvas, the one that we'll focus on is view.ondraw. When you lot override that method, Android will requite you a Canvas object for that view. Y'all can put whatever you desire in it. ViewGroup too has an onDraw() method since it is a view, Drawable has its own depict() method. We'll get into particular virtually overriding that and gaining access to that method.
There are the large three but at that place'southward likewise extra, due east.grand. item decorations for RecyclerView, when y'all brand a custom one yous become onDraw() with the Canvas for the whole RecyclerView. Y'all tin can draw whatever yous desire on it and it'll as well give you lot some information virtually what's currently being shown and what your RecyclerView contains.
How do you get to Painting?
One time you have your Canvas, in club to dictate how everything will look, you lot'll need to create your own Paint objects. Those volition not be provided for y'all - every single Paint is going to end up having a color; everything is going to have that or nix. Yous tin have more stuff. On most Paints, I put this anti-alias flag. It ensures that everything you're drawing is smooth.
Let's say you're drawing a circle. When you draw it, if you lot don't have this flag, it'll look pixelated around the edges because we're trying to draw a curve with little boxes. This will do information technology based on what y'all're cartoon and where you're cartoon it. Information technology'll interpolate those colors so you go i overnice shine curve.
Too, you lot tin give it anything that defines how yous desire your text to look. For example: the typeface, text size, or text style. When we're cartoon shapes, you tin can requite it a behavior for how yous want to draw that shape (e.g. whether yous want it filled in or an outline). You lot can also give it custom shaders.
We take our Sheet. Nosotros have our paints. How do we navigate around?
Navigating the Sail
When you have a Canvass, the height left is always going to be (0,0). A Canvas has its own coordinate arrangement. Regardless of where on screen that Canvas will exist drawn, when you're drawing on a Canvass, (0,0) is the acme left of that Canvas, not necessarily where you are on the entire screen; what is providing you the Canvas doesn't matter. That's something that the overall view hierarchy uses for Android as well.
In that location's other scenarios where (rather than using an (10,Y) coordinate) you'll exist using rotational coordinates mostly when you lot're drawing arcs or circles. Zero degrees is at three o'clock. Once you lot declare the number of degrees that you want to draw your arc, you must declare a radius from center to dictate each individual point in that arc. Also, arcs are ever drawn clockwise. You declare a starting angle, a full number of degrees to draw the arc, and it will ever be drawn clockwise from your starting point.
Example: Bar Chart
Imagine a bar chart. This is a swell example because it can fit into any size and reflects different types of information. When tasked with drawing a custom view, intermission the task down into discrete chunks.
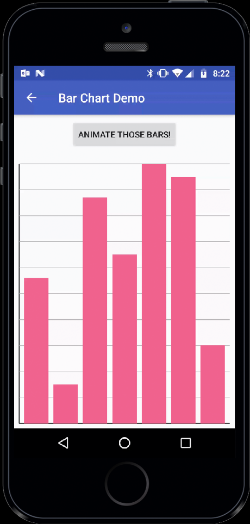
For a unproblematic bar chat, we take three chunks. First, nosotros're going to desire to describe the dark black line on the bottom and the left for our axes. Side by side, nosotros have 10 guidelines going up (10%, twenty%, etc.). Last, we have our confined, i.eastward. the bodily information that we're trying to stand for.
If you are working with a designer, they're probably going to accept ideas on how dimensions are divers. Permit's say that nosotros need to depict the graph in many unlike sizes. When the width changes, we're going to define how the graph changes by defining some padding around the edge of the graph and nosotros are also going to define the spacing in between each of the confined. That ways if we change our width, the bars will fill up the residue of the width later on we define the spacing between them.
When y'all override view within the constructor, initialize everything you're going to demand. Our goal is to keep onDraw() as light as possible so the more than y'all can exercise upwardly front end, the ameliorate.
mBarPaint = new Paint (); mBarPaint . setStyle ( Paint . Way . FILL ); mBarPaint . setColor ( barColor ); Nosotros're going to look at mBarPaint for drawing each individual bar in our graph. This constructor is elementary. We desire it to make full. We don't want an outline for our bar. Nosotros desire the whole thing to exist filled with color. Then we're going to fix our color to whatever color nosotros desire our confined to exist.
mGridPaint = new Pigment (); mGridPaint . setStyle ( Paint . Mode . STROKE ); mGridPaint . setColor ( gridColor ); mGridPaint . setStrokeWidth ( gridThicknessInPx ); mGuidelinePaint = new Pigment (); mGuidelinePaint . setStyle ( Paint . Fashion . STROKE ); mGuidelinePaint . setColor ( guidelineColor ); mGuidelinePaint . setStrokeWidth ( guidelineThicknessInPx ); Next, nosotros're going to define our paint for the grid. Nosotros're going to make a new paint. Instead of having it fill up some large area, we desire to depict lines and then we're going to set it to STROKE. Nosotros're going to set up a color. Since we set it to STROKE, nosotros need to set the stroke width. When you lot're drawing a line, you're non necessarily filling an area but that line itself can have variable widths. Y'all can make it thick, if you'd rather draw lines instead of rectangles.
mGuidelinePaint = new Pigment (); mGuidelinePaint . setStyle ( Paint . Fashion . STROKE ); mGuidelinePaint . setColor ( guidelineColor ); mGuidelinePaint . setStrokeWidth ( guidelineThicknessInPx ); We're going to exercise the exact aforementioned matter for the guidelines going up and everything'southward going to wait the aforementioned here with its own thickness and a different color.
@Override protected void onDraw ( Canvas canvas ) { final int height = getHeight (); last int width = getWidth (); final float gridLeft = mPadding ; final float gridBottom = top - mPadding ; final float gridTop = mPadding ; concluding float gridRight = width - mPadding ; ... } @Override protected void onDraw ( Canvas sheet ) { ... // Draw Filigree Lines canvas . drawLine ( gridLeft , gridBottom , gridLeft , gridTop , mGridPaint ); canvass . drawLine ( gridLeft , gridBottom , gridRight , gridBottom , mGridPaint ); ... } Once we have everything initialized upward-forepart we can override onDraw(), which is a straightforward method. We're going to exist given a Canvas directly and this is where we're going to do all of our cartoon.
First, one time nosotros starting time cartoon, we need our width and peak. Since we broke it down earlier past how big each private component is, the space between them, we need to know how much space nosotros have.
Next, we desire to start building the dimensions of how we desire to draw our graph. We're defining some padding effectually the outside. View groups have a padding that yous tin give it intrinsically. If you want to support padding for your custom view you demand to account for it hither (unlike margins, which are accounted for by the larger view grouping).
In this instance, we're going to ready our left, our padding distance from the left side, our bottom volition be the full height minus some padding. Remember, our bottom is going to be bigger numbers, our elevation is zero, our height we'll have some padding from the summit, and the right volition have our width minus that padding.
Now that we have the area that we want to depict within, we can outset drawing our individual components. Every time you draw something on Sail, it will exist on pinnacle of everything you lot've previously drawn.
Nosotros're going to showtime off by drawing the axes. Nosotros need a start X value and a kickoff Y value, and an end X and terminate Y. Nosotros want our line to start on the bottom left and get to the top left; this will be the left side of our grid. We'll also give it a paint so information technology knows how the line should expect. Nosotros already set up that upward before because you never want to initialize objects in onDraw().
Next, nosotros're going to do the same matter simply nosotros're going to start from the bottom left. Then we're going to go to the bottom right. This will exist the bottom line of our grid. Now we have our axes.
Adjacent, we're going to draw our guidelines, which is similar to setting up the area that nosotros want to draw our filigree within.
@Override protected void onDraw ( Canvas sheet ) { ... // Draw guide lines bladder guideLineSpacing = ( gridBottom - gridTop ) / x f ; bladder y ; for ( int i = 0 ; i < x ; i ++) { y = gridTop + i * guideLineSpacing ; sail . drawLine ( gridLeft , y , gridRight , y , mGuidelinePaint ); } ... } Hither nosotros calculate how we're going to place these lines. We know that we want each line to be on every 10th percent; if nosotros take the total height of our grid (which is going to be our bottom minus our height) and dissever it past 10 that's going to exist the spacing between each individual line.
At present that we know that we can start at the elevation and iterate through, we know we want 10 lines, so we're going to iterate through this loop 10 times. For our Y position of each guideline, we're going to offset at the top which is either zero or the padding (if we've decided nosotros want that). And then we're going to add some number of spacings. For the offset one, it'll be zippo; it'll be drawn direct on the superlative of the filigree and and so we'll motion down until we reach the bottom.
Afterward we accept that Y value calculated, we're going to call drawLine(). We're going to first on the left with that Y value and then become to the right with that same Y value. This will give u.s.a. one big horizontal line beyond the graph. Finally, we requite information technology a paint.
@Override protected void onDraw ( Canvas sheet ) { ... // Draw Bars float totalColumnSpacing = spacing * ( dataCount + 1 ); float columnWidth = ( gridRight - gridLeft - totalColumnSpacing ) / dataCount ; bladder columnLeft = gridLeft + spacing ; float columnRight = columnLeft + columnWidth ; for ( bladder percentage : data ) { // Calculate top of column based on percent. float top = gridTop + gridHeight * ( 1 f - percent ); sail . drawRect ( columnLeft , top , columnRight , gridBottom , mBarPaint ); // Shift over left/right cavalcade premises columnLeft = columnRight + mColumnSpacing ; columnRight = columnLeft + columnWidth ; } } Lastly, on top of our grid, we're going to describe our private bars. First, we're going to figure out how wide each bar needs to be. We calculate the full amount spacing throughout the graph. We know that each bar is going to having spacing on the left and right and then the total spacing is going to exist the number of bars we want to draw plus one times our spacing. Now nosotros can go the individual cavalcade width past taking our right side minus the left side which is the total width of the area we desire to draw the graph in, we subtract the total spacing and and so we'll divide it by the number of column.
Now we have the width of each individual column that we desire to draw. The way we're going to describe this is we're going to start with the leftmost one and then move it over and over and over (like we did with the guidelines). We know we're always going to draw from left to right and nosotros're adjusting the Y.
We're always going to draw a rectangle from the lesser to some pinnacle with a left and right. We're going to start our left with the left of the filigree plus some spacing. The right of that cavalcade will exist the left plus the width of the cavalcade that nosotros wait. Now we tin start iterating over and cartoon each private bar.
I have something named data (a step that yous'll need to add when you're creating this custom view is whatever data yous're trying to display). I find this useful: instead of trying to do all your data transformations inside the view, it should all be done by the time you're drawing. Our information is a bunch of floats (just if yous're not dealing with that, humid your data down to a simple number that you lot can exercise math with is helpful).
The variable here for each individual column determines how tall it will be. We demand to calculate what Y value the acme of our bar will exist. We're going to first with the top of the grid because that'south the tallest information technology tin can be. Nosotros're going to add together our height of the grid times i minus our pct.
If we're showing 100%, we want the bar to be equally tall every bit the unabridged graph. One minus 100% is going to be zero - our top will exist the top of the grid. If nosotros want to bear witness an empty bar, our percentage will be zilch - the height of the grid minus the meridian of the grid, which means our rectangle has no height. Every value in between is accounted for.
Nosotros depict the bars on the graph and our chart is complete. It is important to reiterate: onDraw() is going to get called every unmarried frame that Android needs to render, you need onDraw() to exist quick plenty and then that you can do information technology in that 16 milliseconds that it takes to summate a single frame. You want to do as much piece of work upfront as possible.
Since we take defined a custom graphic, we tin first doing some fun stuff with it.
Let's say nosotros we want the nautical chart to look empty when you first come into the view, and we desire to accept those bars from empty and and then breathing them to their final value. We create a ValueAnimator(), we requite it a elapsing, an interpolator (however you desire your animation to look).
You need to add an update listener to your animation. In one case we need to animate the data, whether it'due south when you first go data or on a button click, we'll tell our animator nosotros want to animate from zero to one and we'll start the blitheness.
Animative from a float of zero to a float of one is powerful. For any blitheness where you're modifying some values that y'all've already determined, if yous can dictate your beginning country and your end state you know when yous take a value of zero you lot want it to expect one way, when you lot take a value of i, you want information technology to look another. Then y'all end up multiplying something by that bladder for every in between example.
The last scrap is this animation update. When we set our update listener, we need to update the fraction for how alpine these need to exist. Nosotros'll call go animated fraction, then y'all have to call and validate. This is the method that will tell your view, something changed, I need to be redrawn, otherwise onDraw() won't get called once again considering it doesn't need to be.
If we get back to our onDraw() when we're dictating how tall we want our bar to be, we at present have some other number. Instead of doing one minus whatever pct summit we're trying to draw, we tin can multiply that percent by that float that's going from nothing to one. When the animation starts, all of our percentages will now be zero. At the cease, we'll exist multiplying by one and so it's the actual information that nosotros want to show.
View Groups are Views
The adjacent place that you can override onDraw() and commencement drawing your custom stuff is view groups. View groups are views. Everything a view can do, a view group tin can exercise. It also can agree children.
At that place is an additional step that you need to be able to draw those views however. This is my least favorite method of all time because the name is unnecessarily confusing. Yous need to call setWillNotDraw(simulated). If it is false that you won't draw, it means you volition. You lot accept to call this in order to tell whatever view group yous're overriding, I want access to the Canvas, and I'll exist drawing some things on top of it.
Similar to view we have onDraw(). For a view group, it volition depict earlier the children are drawn. Annihilation yous practise to the Canvass will happen behind our children.
There are other methods that view group volition provide to become access to that Canvas. 1 of the nearly powerful ones is dispatchDraw(). This method is how a view group will tell all of its children to draw. If you override this method you get access to Canvas in the same way that you lot would in onDraw() but you can too control when you call super.dispatchDraw() which volition tell your view group to tell all the children to draw. If you want to draw underneath, yous can depict a agglomeration of stuff, then telephone call super to draw the children. After calling super, draw more stuff on the Canva. In that case y'all'll start to depict on top of all of the children.
In API 23 Android has an additional onDraw() method; in this instance it'southward onDrawForeground(). This is useful because information technology's used by view groups that have additional stuff to draw on top of the children. For example, scroll view. When you have the little whorl bar on the left that is where your scrollbar is being drawn. If you are implementing a custom roll view or you want some additional UI based on the state of the view group, you tin can use this to draw on top of everything.
Drawables
The next object that we can start drawing with a Sail is in drawables. There's many ways in Android that yous can gain access to these. For example, you can bake in assets into your project, y'all can create custom XML drawables and you can access all of these either with R.drawable in lawmaking or @drawable/ in XML. You've more than than probable dealt with drawables before.
Drawable is an brainchild for something that can exist fatigued. A drawable has its own draw() method, like to onDraw(), dispatchDraw(), etc. It'south a method where you lot can gain admission to a Canvas to exercise any you want with it.
Drawable Methods
One caveat with drawables. The draw() method must have is premises. When y'all're drawing a drawable onto another Sail, you need to have bounds to dictate where that drawable will show up.
If nosotros desire to override a drawable class at that place'due south a couple methods that you'll demand to define. setBounds() you lot don't demand to override but it's useful for figuring out how large your Canvass is. It replaces getWidth() and getHeight() that y'all have from the view. You lot can override that or onBoundsChange(), to get access to how big your drawable is and where it's being drawn on some other Canvas.
You lot tin can override getIntrinsicWidth/Height() these methods to dictate the default size for your drawables. For instance, if you're making a notification badge for a number of unread messages, you lot tin can dictate how big you lot want it to be by default. If someone calls setBounds() on your drawable, information technology will ignore the intrinsic width and premises. If they don't, the intrinsic width and elevation volition exist the default.
There's also a couple methods that you accept to override that drawable dictates you lot have to.
The beginning ii are setAlpha() and setColorFilter(). These are called by the system and whatever paints that you initialize in your drawable form. Both of these methods, you can call directly on your pigment objects, so mostly you tin can delegate it in that location. Whatever y'all're cartoon will reverberate the values set up here.
The side by side one is getOpacity(); this is something that the Android system will expect at to dictate what visibility you have behind your drawable. You're going to end upwardly returning one of these three PixelFormat variables. The outset one is opaque. This implies yous're using the entire space of your drawable and zip is visible behind it. Transparent is the reverse: you're drawing nothing and everything is visible behind information technology. More often you're probably going to return translucent, which is somewhere in between: yous're cartoon over some of your bounds but non necessarily all of it.
Finaly, the near important method, draw() to which you should be familar.
Case: Letter of the alphabet Drawable

Let'southward await at extending a drawable. We're going to get back to our Gmail example. If yous have a profile picture show, yous can show that (run across slides); if you don't, you tin can draw 1. We're going to ascertain information technology. We're going to accept the aforementioned steps that nosotros took with view.
First, we want to pause it into discrete chunks. We have a circumvolve with a letter inside of information technology. We want to ask what dimensions are defined, e.grand. the circle is going to exist some size dictated by a radius, the text will be some size and we want the text to be centered inside of that circle.
public LetterDrawable ( Context context , Cord letter ) { mLetter = letter ; mCirclePaint = new Paint ( Pigment . ANTI_ALIAS_FLAG ); mCirclePaint . setColor ( iconColor ); mLetterPaint = new TextPaint ( Pigment . ANTI_ALIAS_FLAG ); mLetterPaint . setColor ( Color . WHITE ); mLetterPaint . setTextSize ( letterTextSize ); mLetterPaint . setTextAlign ( Paint . Align . Middle ); // Text draws from the baselineAdd some acme padding to center vertically . Rect textMathRect = new Rect (); mLetterPaint . getTextBounds ( mLetter , 0 , 1 , textMathRect ); mLetterTop = textMathRect . peak () / 2 f ; } @Override public void draw ( @NonNull Canvas sail ) { canvas . drawCircle ( bounds . exactCenterX (), bounds . exactCenterY (), premises . width () / 2 f , mCirclePaint ); canvass . drawText ( mLetter , bounds . exactCenterX (), mLetterTop + bounds . exactCenterY (), mLetterPaint ); } Within our constructor for our drawable (we've overridden the drawable class), we demand some letter of the alphabet to draw. We're going to relieve that first. Next, we're going to paint some stuff, so we're going to create some paints. Nosotros're not cartoon lines and rectangles that accept no problem existence drawn on a square pixel screen. Instead, we're cartoon things with curves, so we'll desire to use this anti-alias flag. All of our curves will be shine. Besides, our circumvolve volition have some color.
After that, we're going to create our letter paint. Nosotros haven't used a text paint yet, almost of what you can practise with the text paint is very similar to a normal paint. Nosotros'll set the anti-alias flag over again, so everything is drawn normally, and smoothly, nosotros're going to fix our color to white.
The text size is exactly what it sounds like. And then nosotros have the text align, e.grand. a horizontal alignment (whether you're going to be normal, which will respect your current locale, either left to right or right to left). We want information technology to be centered. This text alignment will affect what coordinates you demand to use when y'all're dictating where to draw your text. If you're using normal coordinates (e.g. left to right), zero is going to be the left, your X coordinate is going to be the leftmost part of your text. But nosotros're using eye so any X coordinates that we use to dictate where that text is drawn, that will be the centre of the text that nosotros're cartoon.
The text alignment is going to affect the X coordinate, but the Y coordinate for drawing text is always going to be based on the baseline. In gild to center our text vertically we'll need to figure out how big our letter of the alphabet is. A text paint has a useful method for this, nosotros have getTextBounds(). Based on your paint, you lot're going to give information technology the string that you lot intendance about, a beginning and terminate index for that string and then a new rect. What it will practice is based on the text size and any attributes set on your text paint, it volition tell you the total space you need to describe that string with that paint. We'll use that to get the full dimensions of our letter.
And then we're going to create a piffling top padding; rather than drawing the baseline at the meridian and then you can't see the text we're going to nudge it down a bit, and then it'll be centered vertical. We defined everything upfront; now when nosotros override our describe() method, in that location's not besides much to exercise.
First off nosotros know that we're going to draw a circle. In this instance, there's not too much to ascertain. We know we demand an X coordinate and our Y coordinate for the center of our circle, and and so that tertiary thing is our radius. Since we know we're trying to fit inside some premises, we're going to become ahead and assume we're fitting in a square area. Our radius is going to be half of our total width. Final, we'll give it a pigment, so information technology knows what it needs to expect like. Afterward we've fatigued that circumvolve, we're going to go ahead and describe our text.
There's a couple things we need to give it: we demand to give it the string that we want to draw, we'll requite it an X and Y coordinate and then our paint. Nosotros discussed the coordinates. Nosotros want to describe, for our X coordinate we want to give it the heart of our space (considering we've set up that center alignment then that's what dictates where we draw in the 10 direction). For our Y we're going to take that top padding which is one-half of the peak of our font and and so nosotros're going to add heart Y to it considering we're drawing on the baseline. Nosotros want the bottom of our text to be one-half the height of our text below the centre. Then we'll give it our alphabetic character paint and then it knows what font to use, what text size, etc.
This is non so bad if y'all're drawing a small piece of text, due east.g. a label. This can get disruptive when you want to draw large pieces of text. It'due south possible to draw any text with this tool, just it doesn't requite united states of america the fine-tuned controls of cartoon big pieces of text. If we're drawing a paragraph, we don't take command over linebreaks or ellipsize in the text if it's too long in some area, maximum number of lines, etc.
In order to solve that trouble we have two great tools nosotros can use, first is android.text.layout and the 2d is android.text.spannable.
StaticLayout + SpannableString
There's 2 types: a static layout and a dynamic layout. The biggest difference is whether your text is going to change. If you lot're drawing static text that won't change, you want to use static layout. If yous're using text that volition constantly be changing (e.g. in an edit text) yous want to use dynamic.
SpannableString will let usa to dictate the way of the string itself that you desire to draw. Not necessarily how it'southward drawn in some area, but how each individual alphabetic character looks. Yous can brand it bold, italics, you can prepare style, give information technology color, highlighting, yous tin can make clickable links–it's very powerful.
Y'all can use it with text view. It's useful when we're drawing our own texts but there are and then many applications to SpannableString.
Opposed to controlling the text itself that we want to draw, StaticLayout would command where the unabridged text is drawn. This will command things similar interruption strategies, ellipsizing, and how much area you have to describe your text within. It also provides a couple convenience methods like the getTextSize() on the text paint that will give y'all some information almost how your text will depict once you laissez passer in a Canvass.
Do we have a Canvas.drawStaticLayout()? This does not exist. Instead, it has its own describe() method. Similar to drawable rather than you overriding it and implementing onDraw() yourself, StaticLayout is going to practice that work for you. It's going to dictate where the text is going to depict, how big it needs to exist and will draw itself on the Canvas.
Example: Uncomplicated Email
This is my simplified version of Gmail. Permit's ascertain each individual component. We want to depict an icon on the left, a circle with an private letter in it (this was the previous instance so nosotros've already made a drawable for this). Nosotros know nosotros're going to have at virtually 1 line for the people we're sending the e-mail to and from. We'll have a subject and a preview (and information technology looks like we're concatting those and so if the subject is two lines we'll append it in that location). Side by side, what dimensions are divers. First, we know that the icon, the circle to our left, is going to exist a ready size. There's going to be some spacing around it. We know the list of people is going to exist a unmarried line, and we know the subject and preview will be up to 2 lines.
public EmailView ( Context context , AttributeSet attrs , int defStyleAttr ) { super ( context , attrs , defStyleAttr ); initDimens (); // Padding, Icon Size initPaints (); // From TextPaint, Preview TextPaint } private void onNewEmail ( Email email ) { mIconDrawable = new LetterDrawable ( getContext (), email . getPreviewLetter ()); mIconDrawable . setBounds ( sPadding , sPadding , sPadding + sIconSize , sPadding + sIconSize ); ... } As we've done earlier in our constructor, we desire to initialize all of our dimensions, our padding, our icon size (things that dictate how big everything is). Next nosotros want to initialize our paints. This is everything nosotros're going to use to draw that stuff onto a Sheet. We'll have 1 for the people listing and another for the email preview. Everything else before has been static. We want to depict up front. We'll need to recreate things every time we get a new e-mail.
First, nosotros'll want to create a new drawable, you could also update this so y'all could apply one drawable and validate information technology and update the letter of the alphabet that you're drawing. We'll create an icon drawable based on the whatsoever preview letter we want to utilize in that circle. We have to ready the bounds in guild for this to depict the right identify on this Sheet. The height left will be inset by our padding and our lesser and right will exist that top left plus the size of the icon.
Next, we're going to need to create our layouts so once we go to onDraw(), all the work is done. We'll need to define how much width we have to draw that text in. We're going to calculate that by taking the total width of our view and subtract the width of everything on the left: two times the padding and the width of the icon (we have the left side of our text), and and so from the right side we'll subtract the padding on the other side. We accept the width that our text can fit within.
Next, this is a nice convenience method that I institute in text utilities. Nosotros're going to use this to ellipsize our people list down to i line. This is commaEllipsize: you give information technology a comma separated list, a paint, the width that yous can fit within. These last two strings dictate how you desire to ellipsize it. If you have a behemothic list and there's plus one, information technology'll be plus 1. You lot tin can requite it a format for if - there's plus eight y'all can shove the 8 in there. That will requite you a 1 line string that fits within that width.
private void onNewEmail ( Email email ) { ... final int textWidth = getWidth () - ii * sPadding - sIconSize // left content & padding - sPadding ; // content and padding on right final CharSequence ellipsizedFrom = TextUtils . commaEllipsize ( electronic mail . getCommaSeparatedFromList (), sFromPaint , textWidth , "+1" , "+%d" ); mFromLayout = new StaticLayout ( ellipsizedFrom , sFromPaint , textWidth , Layout . Alignment . ALIGN_NORMAL , 1 f , i f , false ); ... } Final, nosotros desire to create our static layout. At that place's many things you can requite static layout. This is the most simple constructor. Nosotros're going to requite it the text itself that we want to depict, that ellipsize from text that we made before. We're going to give it the pigment that we want to describe with. This'll have the size of the text, the text colour, etc.. We'll give it the width that we need information technology to fit within. This is a vertical alignment.
These next two numbers will dictate line spacing. If you lot want to describe multiple lines this will dictate how much infinite is in between each line, ane of those numbers is a multiplication (it'll take whatever value and multiply information technology by that much). The other one is addition, that addition should exist zip. We're going to take that spacing, multiply it by one (not change it) and add ane pixel to information technology. This last one is whether you want to include your font padding. More often than not you don't need to worry nearly this only when we're drawing the individual letter, this can be useful.
That is our text layout for cartoon the people lis. Adjacent, nosotros take our preview text. We're going to become the entire string. We're going to accept our subject, add the unabridged body to it, then that unicode is a long dash. Adjacent upwards we're going to create our spannablestring with that text. You lot tin set how you want your text to testify up - we're going to add a bridge to brand the first clamper of this text bold.
private void onNewEmail ( Email electronic mail ) { ... String previewText = e-mail . subject field + " \u2014 " + email . body ; SpannableString preview = new SpannableString ( previewText ); preview . setSpan ( new StyleSpan ( Typeface . Assuming ), 0 , Math . min ( previewText . length (), mEmail . subject . length ()), Spanned . SPAN_INCLUSIVE_EXCLUSIVE ); ... } We're going to requite it the span itself which dictates what style we want to employ, nosotros're going to give start and end indices. Nosotros desire to start at the beginning and either the whole thing (if at that place's no body) or the length of the discipline. This terminal integer will dictate how these indices work, whether you lot desire to include your last indice or not. That gives u.s.a. our cord.
We're going to exercise a similar thing here for edifice our layout. We could use that same constructor before, simply this is the new way to do it with Android Chiliad and above (6.0). At present there's a squeamish builder pattern.
We're going to start off and give information technology some things nosotros did earlier, the text we want to describe, a outset and end indice and the pigment then the width that we demand to fit that text within. We're going to set our alignment for how we want that text to behave inside its area, side by side, we're going to give information technology some behavior on how we want it to ellipsize - we want information technology to ellipsize at the very end, with the "…" , we want that width is how much expanse we're going to fit within. We're going to requite it that width once again, and we want to ellipsize afterwards ii lines.
On older versions of static layout, the ellipsize option does not work. Find beneath a link to an instance project with all of these in it and that will have some code and some examples on how to handle that ellipsizing for multiple lines earlier Android M. Later we've prepare everything we intendance virtually, we'll go ahead and build our static layout and set it. Now, we have everything we demand to describe.
private void onNewEmail ( Electronic mail email ) { ... mPreviewLayout = StaticLayout . Builder . obtain ( preview , 0 , preview . length (), sPreviewPaint , textWidth ) . setAlignment ( Layout . Alignment . ALIGN_NORMAL ) . setEllipsize ( TextUtils . TruncateAt . Cease ) . setEllipsizedWidth ( textWidth ) . setMaxLines ( 2 ) . build (); } Side by side, we're going to override on describe once again.
We have a couple things different: our drawable, rather than telling the Canvas to draw a drawable, the drawable knows how to describe itself. All we need to exercise is give it that Canvas. The bounds take to be ready for this to describe in the right location on that Canvass (which is why we did it ahead of time).
Side by side, we demand to handle how to draw our layout. When nosotros're cartoon individual shapes (east.g. the lines and rectangles we dealt with before and the circumvolve), we tin give it coordinates for where information technology needs to draw on the Canvas. For drawable we requite the premises to reach the same affair, text layouts practise non take this mechanism. You don't accept a way to tell the layout intrinsically I want you to describe here on whatever Canvas I requite you. Rather than giving it a location to describe on the Canvas, we're going to shift the Canvas itself.
A good example to think about this is a 3D printer: you have the printer caput itself. Instead of moving the output itself, you're going to move the base underneath it.
Starting time, we're going to translate our Canvas and then the front text will draw in the right place. We're going to translate it with an X and Y. We know X of the text is going to exist two times the padding plus the size of the icon. The Y is only the padding. One time the Canvass has been translated, we can give the Canvas to the layout and it volition presume that the Canvass is normal. It'll draw information technology on (0, 0). Instead of (0, 0) beingness (0, 0), (0, 0) is the (X, Y) we just calculated. After we draw the from layout, we haven't untranslated yet.
@Override protected void onDraw ( Canvas sail ) { super . onDraw ( canvas ); mIconDrawable . draw ( canvas ); canvas . save (); canvas . translate ( two * sPadding + sIconSize , sPadding ); mFromLayout . depict ( sheet ); sail . translate ( 0 , sFromPaint . getTextSize () + 2 ); mPreviewLayout . draw ( canvas ); canvass . restore (); } Now we're going to translate a chip more. We're not going to move left and correct at all, we know the left alignment is going to be same between those ii pieces of text. We're going to shift it downwards. We're going to take the text size of the from paint. It'll be that same height. This is accomplishing the aforementioned thing of taking the text bounds and putting information technology in that rect and using that peak. And so we're going to add some spacing to it. We can give the Sail to that preview layout and it will depict itself.
We've messed with this Canvas, information technology's not in the state that we got information technology before. There'southward a very important pace that you lot tin can't forget to do. Earlier and after yous mess with your Sail, nosotros have two methods: save() and restore(). These are similar database transactions. The organisation volition call back the initial state of the Canvas when you call salve(), and so when you call restore() it will restore the support you lot saved. This will let united states of america do whatever we desire to the Canvas to depict the text in the right identify and then we call restore. Anything else that is drawing on this same Canvas, e.g. a view group, won't be translated, information technology tin can practice its own transformations.
Transforming the Canvas
You demand to move the Canvass for your static layout to depict in the right spot. We only did translate merely you can do a whole mess of stuff to this Canvas. You're transforming the Canvas by doing matrix calculations. Anything you lot tin do to a matrix, you tin do to this Canvas (rotate it, translate it, calibration, skew it). It's fun to mess with a Canvass: draw some text on in that location then unmess with it.
You ever have to transform your Canvas back, salve() and restore() is the way to practise this. salve() and restore() returns an integer. Every time y'all call salve() that number will increment. There's some other restore() method that yous tin can give it one of those integers. If I want to translate it, depict something, rotate information technology, draw something else and then skew it and depict something else, I tin can call save() before each translation and then bounce back to whichever transformation I want to undo.
Something More… Animated
This is the example I did before: you're moving the base itself instead of the paintbrush. Observe the code here. This is more animated - that heart is a complex path object, we're going to override on bear upon.
Example: Flight Heart
We take an X and Y coordinate for where to draw this heart and then that wiggle is washed by a value animator, similar to the way that nosotros animated those bars in. We're going to animate from negative 30 to 30. It'due south important to interruption information technology into chunks, figure out each individual component that you need to draw, and and then figure out what you need to define, e.yard. the size of the heart and the way that nosotros're going to animate it.
public TouchTrackingView ( Context context , AttributeSet attrs , int defStyleAttr ) { super ( context , attrs , defStyleAttr ); mPaint = new Paint ( Paint . ANTI_ALIAS_FLAG ); mPaint . setStyle ( Paint . Style . FILL ); mPaint . setColor ( heartColor ); mHeartPath = HeartPathHelper . getHeartOfSize ( Math . circular ( heartSize )); mRotationAnimator = new ValueAnimator (); mRotationAnimator . setDuration ( 250 ); mRotationAnimator . setIntValues (- thirty , 0 , 30 ); mRotationAnimator . setRepeatCount ( ValueAnimator . INFINITE ); mRotationAnimator . setRepeatMode ( ValueAnimator . REVERSE ); mRotationAnimator . addUpdateListener ( this ); } @Override public boolean onTouchEvent ( MotionEvent outcome ) { terminal int activity = event . getAction (); if ( userIsTouchingScreen ) { // If a finger is down and/or moving, update the location mIsFingerDown = true ; mFingerX = event . getX (); mFingerY = event . getY (); // If our Animator isn't running, start information technology. if ( mRotationAnimator . isPaused ()) { mRotationAnimator . resume (); } // Must phone call invalidate here invalidate (); } else { // Stop cartoon & blitheness } } @Override protected void onDraw ( Canvas canvas ) { super . onDraw ( sail ); // If user isn't touching the screen, practice null. if (! mIsFingerDown ) { render ; } canvas . save (); canvas . rotate (( Integer ) mRotationAnimator . getAnimatedValue (), mFingerX , mFingerY ); canvas . translate ( mFingerX - mHeartSize / 2 f , mFingerY - mHeartSize / 2 f ); canvas . drawPath ( mHeartPath , mPaint ); canvas . restore (); Wait at the whole projection, it will give you some tips on how to override on impact, when to commencement and end your animations, when to call and validate. Yous want to phone call it merely when you're drawing new stuff; for case, when the user isn't touching the screen nil is changing, there's no reason to invalidate your view and call on describe again because you're going to describe nix.
Flight Heart: Reviewing Steps
Same steps here, you lot're going to create everything upwardly front. In ondraw you lot're going to do equally little as possible.
Questions?
Dave Smith's talk on mastering the Android affect arrangement, it gets complicated in one case yous take views and view groups. Measure out, layout, depict, echo by Huyen Tue Dao also talks about the larger layout structure; instead of overriding some view and drawing on the Canvass, you tin can too practise powerful stuff with the ways your views are laid out, e.g. their position onscreen, relative to other things.
For the static layout and caching I could not notice a expert talk on the layouts, just I did find this interesting article on taking a recycler view, drawing information technology in a custom Canvas with that static layout, and offset saving those static layouts in an LRU cache taking.
About the content
This talk was delivered live in July 2017 at 360 AnDev. The video was recorded, produced, and transcribed by Realm, and is published here with the permission of the conference organizers.

Source: https://academy.realm.io/posts/360-andev-2017-joshua-lamson-custom-drawing-canvas/
Posted by: blackmermexamo.blogspot.com
0 Response to "How To Draw On Android Picture"
Post a Comment